Breathe Your Way to Enlightenment
Breathing! It seems so simple, right? We do it without even thinking. But here’s something to think about: Breathing with intention can actually accelerate your enlightenment. WOW! Who would have thought that simple breathing could enrich your spiritual awareness?
We’d like to share some of our favorite breathing techniques as foundational strategies to focus on.
We encourage you to adopt each of the following breathing techniques and add them to your enlightenment portfolio.
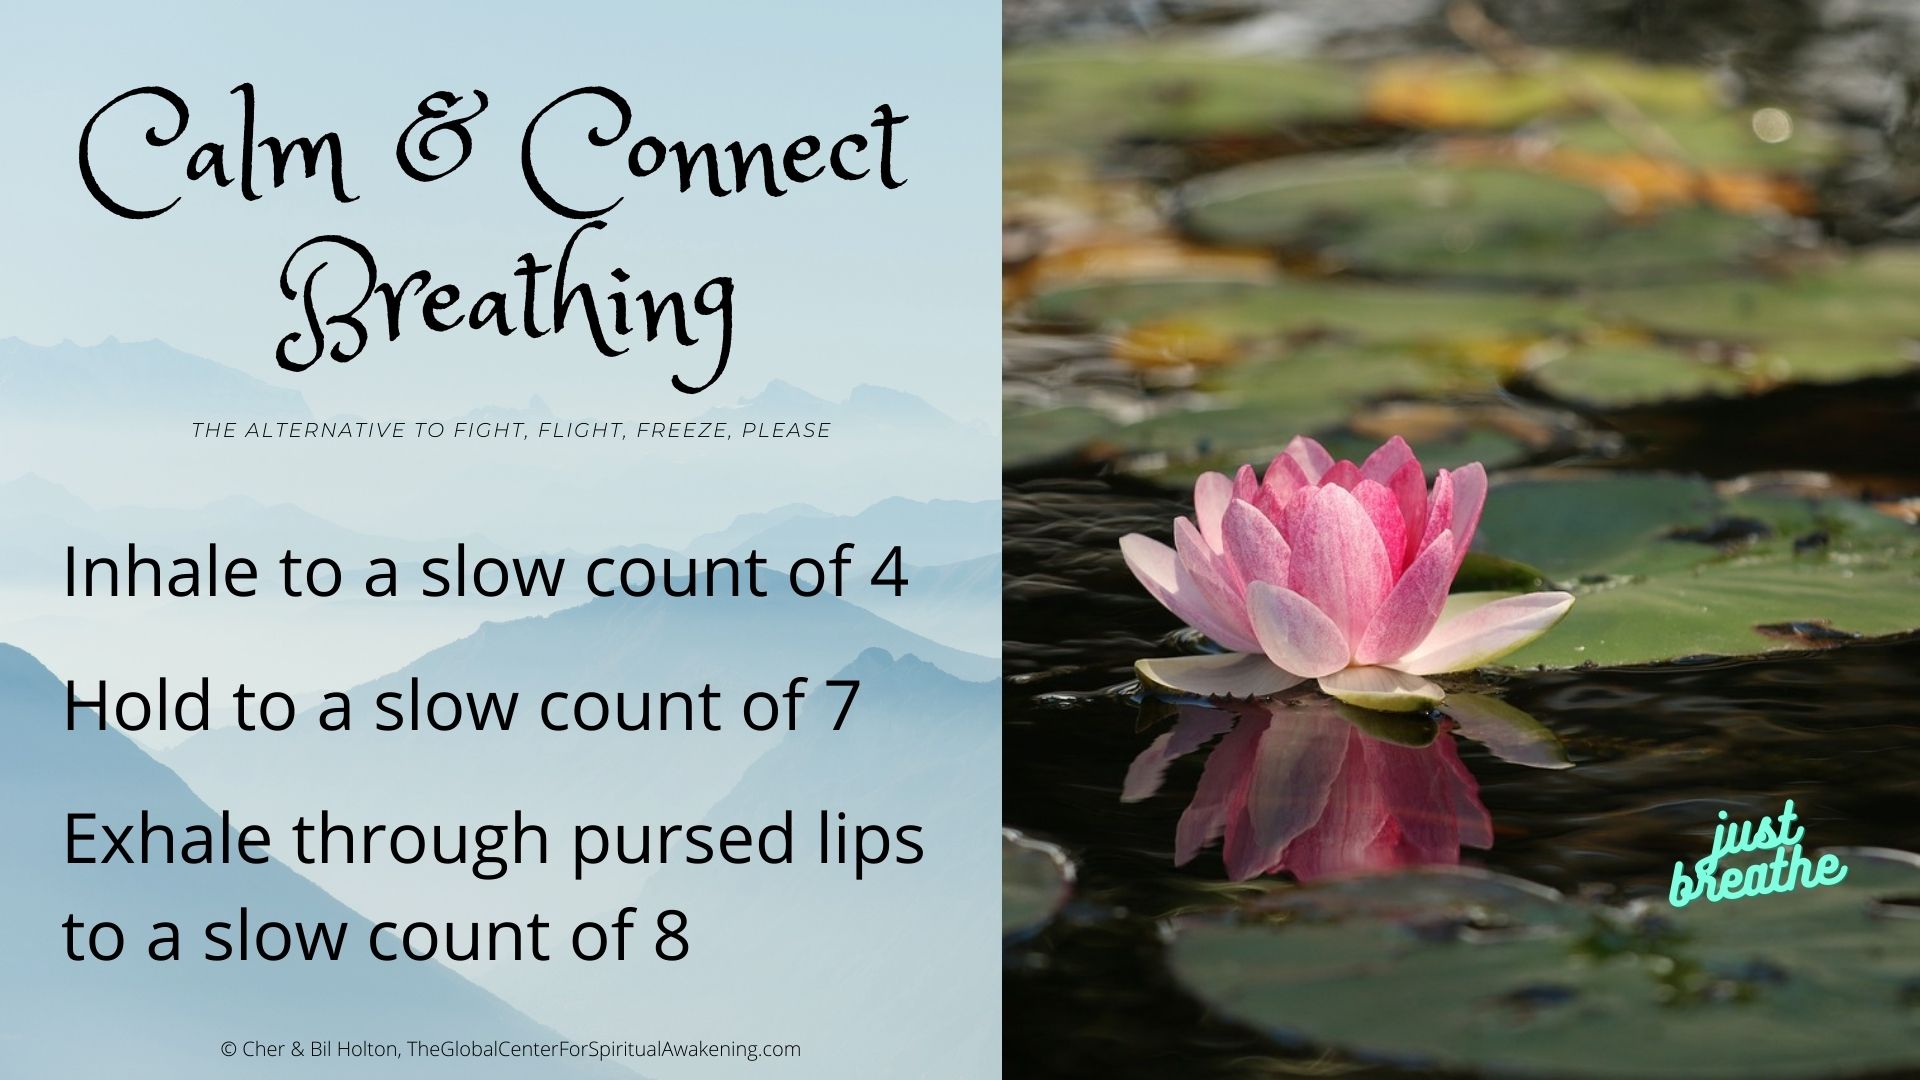
Calm & Connect Breath
This is a basic “Go To” technique you can use to calm yourself immediately. Here’s the background and science connected with this, our favorite technique for breathing:
We’re all familiar with the response to fear typically being Fight/Flight/Freeze/Please. But we’re not as familiar with another response we have, which is built into our body chemistry. It is related to the Vagus nerve, the longest and most complex of the 12 pairs of cranial nerves, serving as the body’s superhighway, carrying information between the brain and internal organs – and it controls what’s called the Calm and Connect Response. We can trigger it by using the Calm and Connect Breathing technique – which we want to share right now so you can begin using it immediately as a way to UP your peacefulness in the midst of chaos!
Here’s how it works:
- Inhale through your nose to a count of 4
- Hold for a count of 7
- Exhale slowly through pursed lips to a count of 8.
Yes, it really is THAT simple! And the results are almost magical! When you use this technique, you remember you have a Divine Nature, with access to incredible inner resources. This frees you to receive Divine Ideas, hear your Intuitive Wisdom, and maximizes your vitality and energy to take action! It’s a great antidote to error thinking – and will definitely UP your Consciousness!
Here are a few other great breathing techniques to add to your repertoire:
Full Yogic Breath
- Choose a comfortable seated or lying position. If sitting, make sure your posture is centered and your spine is erect. If you prefer to lie down, lie on your back and relax your entire body. You may want to place a neck pillow or folded towel under your neck for comfort. Place your hands on your stomach, slightly interlacing the fingers. Your palms should be over your navel.
- Close your mouth and breathe only through your nose for a few moments. Quiet your mind, and focus on your body. Begin by simply observing the natural flow your breath. Let go of any distracting thoughts and allow yourself to focus completely on the present moment.
- When you’re ready, inhale through your nose slowly and with purpose, drawing your breath deep into the lower abdomen and slowly allowing your breath to fill upward (toward the navel) and outward (away from the spine). Initially, focus only on filling the lower abdomen.
- Practice breathing with a controlled, slow breath so you feel the fingers slide slightly apart on the inhalation and back together on the exhalation. As much as you expand on your inhalation, see how much you can expel on your exhalation. You may find your fingertips sliding together a little farther than when you started. Whether they do or do not, the most important thing is to work on breathing from the diaphragm first (belly breathing). Smooth in, smooth out.
- Breathe like this 7-10 times as slowly and as deeply as you can without discomfort or forcing your breaths.
- Now slide your hands up to your ribcage. A good rule of thumb is to position your pinkies to hang over the edge of your lower set of ribs with your thumbs right below the pectorals.
- Continue breathing, except now inhale into the belly and into the ribs. Fill the belly first before expanding to your ribs. Visualize the breath filling your body from the bottom up. First the belly, then the ribs. Feel the ribs expand in all directions – not just forward, but sideways and into your back. Once the lower abdomen has filled completely, continue the inhalation by filling the mid-torso in a similar manner. Continue to draw the breath upwards, from the navel to the ribs, allowing your breath to gently expand the diaphragm, the ribs, and your mid-section as the breath continues to rise.
- As you exhale, retrace the steps from the inhalation. Exhale starting from the ribs and then finishing off with the belly. The navel drawing in should help fully expel your air. Don’t force your breath in either direction, in or out.
- Repeat this another 7-10 times slowly and easily. First into the belly, then into the ribs. Out from the ribs, then out from the belly.
- Now cross your hands and place them on your chest, resting the palms just above the heart center with your fingertips gently touching the collar bones.
- Continue breathing. Start into the belly, then into the ribs, and finally into your chest. Fill up your torso with breaths from the bottom up, all the way to your fingertips. Feel your breath rise along the spine, expanding your interior in all directions. Exhale the same way the breath came in. From the chest, through the ribs, and out of the belly. You may experience a brief, but natural pause at the top of the inhalation. If this occurs, just allow it to be there for a moment before surrendering to a long, slow exhalation. First, release the breath from the upper chest as the heart, lungs, sternum and shoulders all relax—dropping down and drawing in, toward the spine. Then, expel the breath from the mid-torso, feeling the ribs contract and the navel draw in, closer to the spine. And lastly, release the breath form the lower abdomen, feeling the belly contract and draw inward toward the spine.
- Remember to keep your spine as erect as possible. Just by following the breath from the bottom to the top, from the top to the bottom, you’ll teach yourself to be mindful of how your spinal column is stacked. Again repeat this 7-10 times.
After you’ve found your full yogic breath expanding throughout these three areas of the body, allow your breathing to normalize. Pay attention to how it feels as you inhale and exhale, but don’t try for the deepest breath possible for each breath. Then, before you move on to your next series of breaths, pause briefly to notice how you feel. Are you more refreshed, awake, and relaxed? As you become more comfortable with full yogic breathing, you can integrate this style of breathing more and more throughout your day-to-day activities.
The Cleansing Breath
The Cleansing Breath is an advanced breathing technique that consists of short, powerful exhalations and passive inhalations. This practice is also known as the ‘Breath of Fire’ because it helps purify the lungs and nasal passages of toxins and other impurities. This energizing technique will reboot the biochemistry of your body, mind and soul connection.*
Here’s how the Cleansing Breath works:
- Stand or sit erect.
- Inhale a Full Yogic Breath.
- Hold your inhalation for a few seconds.
- Pucker your lips as if for a whistle (without swelling out your cheeks). Then exhale just a little air through your puckered lips with considerable vigor.
- Stop for a moment, still retaining some air, and then exhale a little more air forcefully.
- Repeat the short bursts of forced air until all of the air in your lungs is exhaled. Remember to use considerable force to exhale the air through your lips.
- Breath easily and normally for a few moments and then repeat steps 1-5 once or twice more. Refrain from over-using this highly energetic technique at one sitting. We recommend employing it once to three times a month, especially if you live in an environmentally unfriendly area that imposes a health risk to breathing outside air. Otherwise once a month is sufficient.
*It should also be noted that this technique isn’t recommended for those who suffer from chronic cardiac problems, hernia and spinal disorders. In addition, those who suffer from severe respiratory infections, colds and nasal obstruction should not perform this breathing and cleansing technique. Most physicians usually ask people suffering from high blood pressure and diabetes to refrain from performing this breathing technique. Those with abdominal ulcers should also avoid performing the technique. If you’re pregnant, you should not practice this type of breathing exercise until consulting with a qualified yoga instructor who has practiced this breathing technique and is familiar with it.
The Nervous System Vitalizing Breath
This breathing technique energizes the entire nervous system and sends the Vital Force (prana) into all parts of the body. Here’s how the Nervous System Vitalizing Breath works:
- Stand or sit erect and inhale a full yogic breath.
- Retain your inhalation for a few seconds.
- Extend your arms straight out in front of you, shoulder high, but keeping your arms relaxed with sufficient strength to keep them in that outstretched position.
- Now clinch your fists and slowly draw your hands back toward your shoulders so that by the time your fists touch your shoulders they will be tightly clinched.
- Then, keeping your fists tightly clinched, slowly extend your arms outward again and then draw them back rapidly (still tense) several times.
- During your last extension unclench your fists and exhale vigorously through your mouth. Lower your arms and unclenched fists to your side and relax.
- Breath normally by inhaling through your nose and exhaling through your mouth.
Respiratory Revitalization Breath
This breath strengthens and develops the respiratory muscles as well as the lungs and chest. Yogis have found that holding the breath for a moment revitalizes the respiratory system and the oxygenates the blood itself, because it actually purifies the air that has remained in the lungs from the previous inhalations.
The interesting thing is that the breath which is retained momentarily gathers up the stale air so that when you exhale vigorously at the end of this respiratory breath you literally expel the stale air, cleansing the lungs. Like the Cleansing Breath, this breathing practice helps eliminate bad breath which arises from poorly ventilated lungs due to improper breathing.
Here’s how the Respiratory Revitalization Breath works:
- Stand or sit erect.
- Breathe easily and normally for a few breaths.
- Inhale a Full Yogic Breath (belly breath) through your nose.
- Retain your inhalation for as long as you can comfortably.
- Exhale vigorously and fully through your open mouth so that you empty your airways.
- Inhale another Full Yogic Breath (belly breath) through your nose.
- Once again retain your inhalation for as long as you can comfortably.
- Exhale vigorously and fully again through your open mouth so you empty your airways.
Several times every other day employ the Respiratory Revitalization Breath to keep the stale air out of your respiratory system and to keep your blood oxygenated. In a couple of weeks you’ll notice the medicinal effects of this breathing technique and how it enhances your overall energy level.
EFT Lung Cell Stimulation
This breathing technique uses the EFT tapping technique to help stimulate the air molecules in the lungs. It employs the combination of breathing and tapping to achieve biochemical synchronization. Like acupuncture and acupressure, EFT (Emotional Freedom Techniques) is a set of psychosomatic techniques that use the body’s energy meridian points. You can stimulate these meridian points by tapping on them with your fingertips – literally tapping into your body’s own energy and healing power.
During the last decade psychologists and neuroscientists have found that the brain’s stress and fear response – which is controlled by an almond-shaped part of your brain called the amygdala – could be lessened by stimulating the meridian points used in acupuncture, acupressure, and of course, tapping.
Here’s how the EFT Lung Cell Stimulation works:
- Stand or sit erect with your hands at your sides.
- Inhale a proper diaphragmatic breath through your nose.
- While inhaling slowly, gently tap your sternum lightly with your fingertips as you move the tapping up and down your sternum.
- When your inhalation is complete, hold your breath and tap the sternum again, using the same tapping up-and-down sequence.
- As you exhale slowly gently tap your sternum lightly with your fingertips again as you move the light tapping up and down your sternum.
- When your exhalation is complete, hold your breath and tap the sternum again, using the same tapping up-and-down sequence.
- Repeat the inhalation/exhalation/tapping process one more time.
- Now without tapping, take a Full Yogic breath through your nose and exhale slowly through your mouth.
- Repeat the Full Yogic Breath 3-4 times slowly.
- Take a quick breath through your nose, and while you hold your inhalation briefly, tap your sternum 3 times before exhaling through your mouth.
- Repeat step 10 two more times and then relax.
- End this breathing technique with a Full Yogic Breath.
Chest Expansion Breathing 1
Because the lungs are surrounded by a rib cage the ribs play an important part in chest and lung expansion. Preserving their elasticity and ease of coordination is essential in breathing your way to enlightenment.
Here’s how Chest Expansion Breathing 1 works:
- Stand comfortably erect and breathe easily.
- Place the hands on each side of your body as high as you can toward your underarms so that your thumbs are positioned near your armpits, your palms are touching the side of your chest, and your finger tips are positioned over your ribs.
- Slowly inhale a Full Yogic Breath and hold your breath for a short time.
- As you exhale slowly gently push your rib cage up toward your underarms so they keep your ribs in place.
- Slowly inhale a Full Yogic Breath and hold your breath for a short time again.
- This time as you exhale slowly, gently push your rib cage back toward your back so you keep the surface of your chest expanded slightly.
- Raise your arms over your head and stretch them as high as you can as you inhale a Full Yogic Breath. As you exhale lower your arms down to your sides.
- Repeat steps 1-7 twice more.
- Relax and breath normally.
- Practice this breathing technique a couple of times a month to promote chest expansion.
Chest Expansion Breathing 2
This sequel breathing technique to Chest Expansion Breathing 1 helps preserve the chest, ribs and lungs elasticity and ease of coordination which is essential in breathing your way to enlightenment.
Here’s how Chest Expansion Breathing 2 works:
- Stand close to a wall with your palms chest high on the wall; or lie on the floor with your face toward the floor, your belly touching the floor, and your palms on the floor shoulder high.
- Inhale a Full Yogic Breath and hold your breath for a moment.
- As you exhale forcefully push yourself from the wall or floor until you’ve fully extended your arms.
- Now inhale slowly using a Full Yogic Breath as you lower your body to the wall and/or floor.
- Inhale a Full Yogic Breath again and hold your breath for a moment.
- As you exhale forcefully push yourself from the wall or floor until you’ve fully extended your arms again.
- Repeat steps 4-6 which will make the third time you’ve done this chest expansion breathing exercise.
- If you’re standing, lower your arms to your sides and remain standing; and if you were doing push-ups move to a sitting position. In either case breathe easily a few times as you end this breathing exercise.
- Practice this exercise and Chest Expansion Breathing 1 as often as you like and time permits. You’ll notice a difference in your chest expansion, energy and muscle tone after a couple of weeks.
- In combination with the other breathing techniques, your favorite meditation techniques, and proper eating you’ll begin to see the relationship between all of these mind/body techniques and your growing enlightenment.
Alternate Nostril Breathing
If you’re feeling nervous about an upcoming event, stressed out about a life situation, or unclear about a decision you are making, this is the technique for you! Alternate Nostril Breathing has a long tradition in both yoga and Ayurvedic medicine. The proven benefits are amazing, including restoring balance in both hemispheres of our brain rejuvenating the nervous system, enhancing our ability to focus, removing toxins from the body, and calming ourselves.
Here’s how Alternate Nostril Breathing works:
- Find a comfortable sitting position, making sure your posture is erect.
- Relax your left palm comfortably into your lap and bring your right hand just in front of your face.
- With your right hand, bring your pointer finger and middle finger to rest between your eyebrows, lightly using them as an anchor. The fingers you’ll be actively using are the thumb and ring finger.
- Close your eyes and take a deep breath in and out through your nose.
- Close your right nostril with your right thumb. Inhale through the left nostril slowly and steadily.
- Close the left nostril with your ring finger so both nostrils are held closed; retain your breath at the top of the inhale for a brief pause.
- Open your right nostril and release the breath slowly through the right side; pause briefly at the bottom of the exhale.
- Inhale through the right side slowly.
- Hold both nostrils closed (with ring finger and thumb).
- Open your left nostril and release breath slowly through the left side. Pause briefly at the bottom.
- Repeat 5-10 cycles, allowing your mind to follow your inhales and exhales.
Steps 5-10 represent one complete cycle of alternate nostril breathing. If you’re moving through the sequence slowly, one cycle should take you about 30-40 seconds. Move through 5-10 cycles whenever you feel stressed, frazzled, unclear, or in need of a reset button.
Tip: The length of your inhales, pauses, and exhales should be as consistent in duration as possible. For example, you can start to inhale for a count of five, hold for five, exhale for five, hold for five. You can slowly increase your count as you refine your practice.
© Bil and Cher Holton, GlobalCenterForSpiritualAwakening.com
39 thoughts on “Favorite Breathing Practices”